As part of my New Year “Green Goals“, I have recently started looking at how to do compost at home last January. I must admit, I had to do a lot of reading and researching because I have never done this before.
Being in Manila, there’s already a lot of problems that we are encountering on a daily basis, like heavy traffic, poor air quality, and overflowing garbage dump sites. It is worrisome every time we hear that after some rally or public gathering in Rizal Park or on EDSA, a dozen or so dump trucks have to come in to haul several tons of garbage to sanitary landfills — like the ones found in San Mateo and Rodriguez in Rizal Province; one in Quezon City, the Payatas landfill, is even beside La Mesa Watershed, Manila’s source of drinking water!
Closer to home, we have to deal with the stench of rotting refuse from leftover bits of food, fruit peels, and many other biodegradable waste. And while we’re waiting for the dump trucks to come and get our garbage, pests come in to savor the odors, be it ants, cockroaches, flies, and rats.
Also, the soil quality for gardening isn’t that good either. Sure, I could choose to buy soil from gardening shops, as well as synthetic fertilizer, but then, why not try to hit two birds with one stone, so to speak? I want to skip the synthetic fertilizer, lessen our garbage and naturally improve the soil quality.
So: Compost!
I already anticipated some back-breaking work for the pit, but a little workout wouldn’t hurt, I suppose! Thank God for the Internet and tree-hugger friends, I was able to do a lot of research. Most of what I read shared experiences in doing compost via compost bins, and not so much into pits. I thought, I should try to start via pits first, because, well, we have a small patch of soil that I could start with for experiments, then venture to bins later.
Prepare the compost pit.

My friend Mr. Bong Socco helped me with an easy outline how to start my composting goals. Armed with a shovel and similar tools, I started digging my roughly 1 meter x 1 meter x 1 meter pit.
To start off the compost, I needed materials that will rot! After reading up on the Web, I came across the concept of browns and greens….
Gather the browns and greens.
Browns — dried material rich in carbon.  Common examples include used paper, carton from boxes, receipts, used tissue paper, dried leaves. Even envelopes from billing statements — just make sure any plastic sheets or adhesive tape are removed.
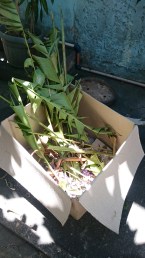
Greens — items rich in nitrogen. These include the usual food waste like fruit peels, egg shells, crab shells, discarded vegetables, fallen leaves, twigs, and grass clippings. Coffee ground (free if you ask for them from your office pantry’s coffee maker or at a nearby coffee shop) is also good to add!
Some articles specify a particular ratio when combining browns and greens. But because I’m after composting on a thrice-weekly basis, as waste items become available, I don’t strictly, religiously adhere to the ratio, but simply keeping in mind that there should be a lot more browns than greens, meaning getting all those papers accumulated. Now I won’t have to sigh at all those ATM receipts I get on a daily basis!
Here’s a tip! For compost to be successful, both browns and greens have to be shredded. Not necessarily using a blender, but it will decompose sooner if you could tear (or chop) the banana peels into thinner pieces, or tearing the paper receipts into smaller pieces. More surface area will hasten the decomposition process faster!
Start “cooking”!
Come compost day, with the greens and the browns on hand, I just place the browns on a layer, interspersed with the greens. It is ideal to make sure they are uniformly mixed, and then top it off with a thin layer of soil. Keep it moist by pouring water, but make sure that it’s not too wet.
When done, cover the compost pit with a G.I. sheet (aka yero), or anything that will keep rain from making it soggy, as well as the flies. DO NOT LET FLIES INTO THE COMPOST! You wouldn’t want that typical, rotting smell of maggots to discourage you from continuing your compost, no?
Mix ’em up every few days.

When you have a fresh batch of browns and greens, put them in, and mix it. Don’t forget to keep the mix wet. In succeeding days, it is helpful to stock shredded paper into a “brown bag” and greens into used ice cream tubs to store them until enough of both browns and greens are ready to be composted. This way, things are still organized, and the greens will normally rot and smell, and the plastic container will contain the smell until they need to be used.
Several critters will be visiting your pit after a few days. So far, I haven’t seen roaches in the pit, which was one of my worries early on, because we don’t want that compost pit to become a breeding ground for pests! I’m not so fond of worms though, but seeing them in it gives me peace of mind, knowing that the pile is in the process of decomposition. This is actually one place where I don’t mind them squirming around!
The smell, as they say, should be earthy. Nothing like your typical garbage bin where you know something stinks. It’s not exactly a heavenly smell, but hey, it’s compost.
Moving forward
It’s already March, and we’re well into our third month of composting. I’m now preparing a second pit, similarly sized, so I can use as an auxilliary pit for new batches while the first one slowly becomes humus. Later on, when the second pit gets activated, I can then use the partly-decomposed humus in the first pit as soil cover for the second pit’s batches, keeping a healthy cycle of decomposition!
I noticed that we are disposing less than half of our past garbage volume to the dump trucks, which includes most of what I’ve mentioned above! My mom and I are likewise looking forward to the soon-to-be-generated humus that will liven up our plants, which badly need some (organic) vitamins 🙂
I’ve been doing that also, thank you for sharing your thoughts
Welcome Gailbert! Glad to see others into the hobby too! When I started out, I didn’t know who to ask locally, so I thought it might help if I document it also. ?
greαt! 🙏🏻